Copyright 1996 Miracle Software Inc.
Welcome to World Wide Web Weaver for Macintosh, the professional World Wide Web page creation tool.
World Wide Web Weaver is an application designed to help you create World Wide Web pages (called HTML documents) using an easy yet flexible interface.
Web pages are written in a text language called HyperText Markup Language, or HTML for short. This language is interpreted by your Web browser as it reads the page document. The HTML instructions tell your browser how the page should be displayed on your computer.
An example of HTML is:
Web pages are written in a text language called <EM>HyperText Markup Language</EM>, or <EM>HTML</EM> for short.
The resulting layout would be:
Web pages are written in a text language called HyperText Markup Language, or HTML for short.
HTML gets much more complex that the above example. It involves dozens of formatting possibilities arranged in hundreds of combinations. Just learning all the HTML tags that dictate the formatting of your Web pages would be a time-consuming task.
That is where World Wide Web Weaver steps in to allow you quickly and easily to add HTML tags to your documents without having to memorize the myriad details.
Requirements
World Wide Web Weaver for Macintosh operates on any Macintosh computer that meets the following requirements:
- At least 4 megabytes of memory
- Hard Drive
- Capable of using high-density (1.44mb) disks (required for installation only)
- MacOS version 7.0 or later
Registering
Before installing World Wide Web Weaver, you should take the time to complete and mail the registration card to Miracle Software Inc..
Backing Up
Also before installing, you should make sure to lock the floppy disk on which World Wide Web Weaver arrived and make a copy of the disk. By locking the disk you ensure that the disk cannot become infected by a virus or get erased accidentally while you are making the copy. Making the backup copy of the disk will be helpful if something happens to your original disk.
Installing From The Disk
Insert the disk containing World Wide Web Weaver.
On the disk you will find a file called World Wide Web Weaver. Double-click on its icon to open this self-extracting archive file. It contains a number of files compressed into a single document for ease of installation.
The archive will ask you to indicate the location where you wish to store World Wide Web Weaver. Feel free to install the archive anywhere you find convenient on your hard drive.
Once the extraction is complete, so is the installation! To begin using World Wide Web Weaver, open the folder that was copied to your hard drive. In the folder you will see the World Wide Web Weaver application icon; this is the icon you will double-click to open the program.
Note: Do NOT move any of the files or folders from the folder containing World Wide Web Weaver.
The first time you run World Wide Web Weaver, the program will ask you to enter your registration number. This number can be found on the registration card and on the label of the floppy disk containing World Wide Weaver.
| How To Use World Wide Web Weaver |
The primary purpose of this manual is to teach you how to use World Wide Web Weaver to construct Web pages. Inevitably, this means that it will include some general instruction on the use of the World Wide Web and on Web page creation. However, we strongly urge you to be comfortable with using the Web and with the appearance of Web documents before attempting to create your own pages using this or any other tool.
A valid Web page should conform to certain formatting standards. World Wide Web Weaver makes this compliance automatic; creating a new document using the 'New' command from the File menu automatically starts your Web page with the following skeletal outline:
<HTML><HEAD><TITLE>Untitled
</TITLE></HEAD><BODY>
</BODY></HTML>
In the above outline, the pair of <HTML> tags surrounding the entire document tells a Web browser application that the text is in HTML format. The HTML standard requires this set of tags. Even though most Web browsers do not enforce the use of these tags, it is nonetheless wise to keep them in your documents to ensure maximum Browser support.
The <HEAD> tag is used to indicate the beginning of the section of your Web document where attributes such as a title are defined. (You may in fact have noticed that the title is the next element in the skeletal Web page outline.)
The <TITLE> tag pair surrounds the text that will be displayed in the title bar of the Web browser window. An easy way to edit the head and title tags is to use the Head Tag Editor on the Tags menu.
The <BODY> tag pair is probably the most important in the outline. The body tags indicate that everything between the beginning marker (<BODY>) and the ending marker (</BODY>) is the body of the document. All text and graphics the user will see (with the exception of the title tag) should go between these tags.
Crash Course In World Wide Web Weaver
Once you have the above outline, you are ready to begin your page. Here are most commonly used features in Web page design, for quick reference:
Text Styles
Graphics
Connecting pages to other pages
The Details
Ready to get started? Well, almost. Before jumping in, there are a few other HTML tags you should keep in mind...
Simple Tags
Simple Tags fall into two categories...
- Format Tags
- Format tags are the simplest and most commonly used tags. These tags usually have a beginning and ending marker which surround text. An example of a simple format tag is the bold format tag: <B>This is an example</B>A Web browser would interpret this tag so that the result would look like this: This is an example
These tags derive their name from the fact that they are commonly used to format text. To add these tags to your document, select the text that you want formatted and then choose the format tag you want from under the Tags menu, the toolbar or from a Tag Floater Window's list. To see a listing of all installed format tags, choose the Tag Description option under the Help menu.
- Special Characters
- In the World Wide Web, not all characters can be simply typed in and then viewed in a Web browser. The reason is that some characters such as the ß character are not standard and other characters such as " & < > have special meaning to HTML readers like Web browsers. Their appearance in a document thus results in a display change which may not be what you intend when you need to use one of these character in its more common meaning.
To get around this, the World Wide Web defines HTML tags which you can use in place of these characters. They will be translated into the appropriate characters by the user's Web browser. For example, the tag & will display a & character when viewed by a web browser.
Under the Tags menu, World Wide Web Weaver provides a list of Special Characters you can insert into your documents. To insert one of these tags, you can either select the desired tag from the Tags menu or simply type the character and World Wide Web Weaver will automatically insert the appropriate HTML tag in its place (unless you have selected not to do so in the preferences window). The exception to this is the ", &, <, and > characters. Since these characters are so commonly used to construct tags, they can only be inserted using the Tags menu.
Complex Tags
To add such complex items as graphics and links to your documents, more complete tags are required. To ease the addition of complex tags, World Wide Web Weaver provides tag editors. These editors help insure that complex tags are created without error since these editors hide much, if not all, of the HTML from you while allowing you optionally to edit the HTML after you have used the editor.
The following tag editors are included in World Wide Web Weaver...
-
 Anchor Link
Anchor links are most often used to create links from one place in a single Web page to another place in the same page. They are, however, flexible enough to permit links between pages as well.
Before you can create an anchor link, you must have an anchor point, which is a destination point for the anchor link. Using the Anchor Link Editor you can create links to anchor points you have defined either in your current page, or in another page.
To use the Anchor Link Editor, place the insertion point at the desired location in your document or select the text that is to serve as the user's click location to open the link. Select the Anchor Link option from the Tags menu or from the toolbar.
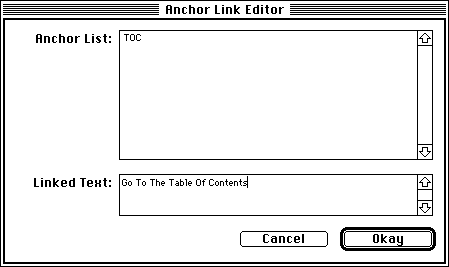
You are then faced with a dialog box asking if you want to create a link to an Anchor Point in this document or in another document. If you indicate that you are linking to a separate page, World Wide Web Weaver will open the Link Editor so you can create your link to the specific file. If you indicate that you are linking to the current page, the Anchor Link Editor will be opened. The Anchor Link Editor consists of the following items:
- Anchor List
- This is a list of all defined anchor points in the current document.
- Linked Text
- This is the text the user will see underlined (or otherwise highlighted depending on his or her Browser preferences) and will click on to follow the anchor link. Note: If you select any text before you open the Anchor Link Editor, that text will placed in this field.
-
 Anchor Point
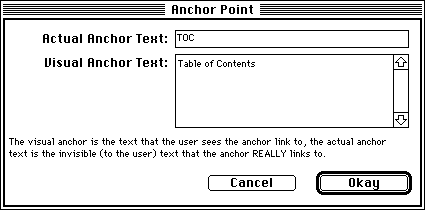
Anchor Points are the destinations of Anchor Links. These are the specific points in pages to which links connect. (By default, a link to a page takes the user to the top of the destination page. This tag is often used to force the top line of the browser window to be chosen based on the user's link use.
To use the Anchor Point Editor, place the insertion point to the desired location in your document (or select the anchor text) and then select the Anchor Point option from the Tags menu or from the toolbar. The Anchor Point Editor contains the following items:
- Actual Anchor Text
- This text is hidden from the user but it is the label, or name, of the anchor point to which your anchor link actually points. You can leave this blank, in which case World Wide Web Weaver uses the visible text as the name of the link as well.
- Visual Anchor Text
- This is the text that the user sees highlighted when he or she clicks on the Anchor Point. As a rule, this text also scrolls to the top of the Browser window but some browsers may treat this aspect of an anchor link differently.
-
 Body
Body
Proper HTML documents contain the following outline...
<HTML>
<HEAD>
<TITLE>
</TITLE>
</HEAD>
<BODY>
</BODY>
</HTML>
In the above outline the body tag is used to indicate that every thing between the beginning marker (<BODY>) and the ending maker (</BODY>) is the body of the document. All text and graphics the user will see should go between this tag (with the exception of the Title tag).
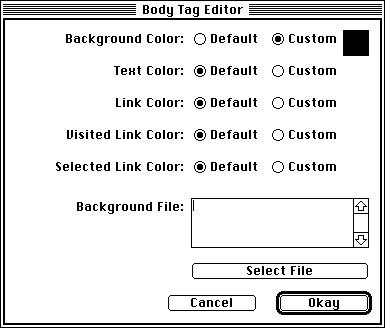
The body tag also has attributes such as colors and background which you can use the Body Editor to edit. To open the Body Editor simply select "Body" from the Tags menu or from the toolbar. (As a rule, you will select the text whose appearance you wish to change before making the menu selection.) The Body Editor has the following options:
- Background Color
- Use this option to select a custom color to use as a background. Note: If you also use the Background File option, the background color will be overridden and only the picture or pattern in the file will appear.
- Text Color
- Use this option to select a custom color in which to display normal text.
- Link Color
- Use this option to select a custom color in which to display links.
- Visited Link Color
- Use this option to select a custom color in which to display links that the user has already visited.
- Selected Link Color
- Use this option to select a custom color in which to display links while the user has them selected.
- Background File
- Enter the path to a graphic file to be used as a background pattern for your page in this field. Note: Use the Select File button to have World Wide Web Weaver insert a relative path from your document to the graphic background file.
-
 Forms
Forms
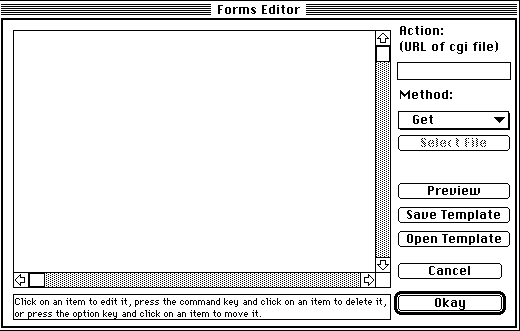
Most of the World Wide Web involves the one-way transfer of information, from the system or server to the user, with little information from the user. To provide a means for the user to communicate with your Web page, the World Wide Web provides forms. Forms are groups of input items such as text fields, pop-up menus, buttons and other items. The creation of form items is quite simple using World Wide Web Weaver's Form Editor, which you can access under the Tags menu and from the toolbar. Receiving the information the user has entered into a form is much more complex. World Wide Web Weaver can only help with a part of this process.
Once the user has filled out (or processed) a form, the user must press a button to transfer the information the user has entered into the form, back to your Web page for further processing. The Web browser then gathers all of the information and sends it to the URL (address) listed in the action field. This URL will USUALLY contain a program to process the information stored in the form. This program is called a CGI (common gateway interface) program or script. CGI programs are generally written in scripting languages such as AppleScript, UNIX scripting tools such as Perl (the most commonly used language for CGI scripts) or traditional programming languages such as C/C++ or Pascal. These programs extract the desired information from the form submitted by the user, process it to carry out tasks such as search a database, send email, enter data into a log, etc. and optionally send a response back to the user (indicating success or failure, etc.).
CGI programs can be written to accomplish many many different things; they are fairly complex to master. Since CGI applications are so diverse in use and design, it is beyond the scope of this manual to explain how to write and use CGI's.
However, you can easily use World Wide Web Weaver's Form Editor to create your forms and to set up the action to be taken when the user presses the "Submit" button or its equivalent in your form. After you have laid out your form to your satisfaction in the Form Tag Editor, you'll almost certainly want to edit it in your Web page. The Form Tag Editor does not include any way for you to reposition items on the page layout; you'll have to use Format Tags to accomplish this.
The Forms Editor consists of the following items:
- Action
- This is the URL to which the form information will be sent when the user presses the Submit button. In most cases this will be the URL of a CGI script, but it is not required to be.
- Method
- This is the HTTP method used to submit the form to a server. Your choices are;
- Get
- This option causes the forms contents to be appended to the action URL as if they were a normal query.
- Post
- This option causes the forms contents to be sent to the server in a data body rather than as part of the URL.
- Preview
- This button allows you to preview what your form will look like when displayed, before you press the Okay button to generate the HTML that will create the form.
- Save Template
- This button allows you to export a copy of the current items you have in the form canvas. This can be useful if you think you might be re-editing your form at a later time and you want to use the Forms editor to do so. See Open Template for more details.
- Open Template
- This button allows you to import a form template that was saved using the Save Template button (see Save Template).
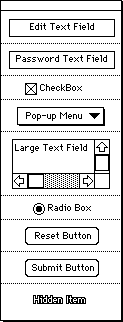
- Form Item Palette
- This is a palette containing all of the items you can add to your form. You place items into your form by clicking on them in this palette, then responding to the ensuing dialog which requests the needed information about each type of item.
- Edit Text Field
- This form item is an editable text field.
- Password Text Field
- This form item is just like an edit text field except each character the user types is displayed as a bullet. As the name implies, this item is usually used to allow the user to enter passwords.
- CheckBox
- This item implements a basic checkbox item.
- Pop-up Menu
- This implements a basic pop-up menu.
- Large Text Field
- This item is similar to the edit text field except that it contains horizontal and vertical scrollbars to allow larger amounts of text to be entered.
- Radio Box
- This item implements a basic radio box item. To create a set of radio boxes (i.e., only one is checked at a time), all radio boxes must have the same name.
- Reset Button
- This item creates a button to reset your form to the default/original settings for the user.
- Submit Button
- This item creates the button the user presses to submit your form to the URL listed in the Action field.
- Hidden Item
- This item creates items in your form that are hidden from the user's view. These items are usually most useful to send additional information to your CGI without the user having to see it.
- Forms Canvas
- This is a list of the items in your form. To re-edit an item simply click on the item. To delete an item, press the command key and click on the item. To move/reorder an item, press the option key and click on the item.
-
 Glossary
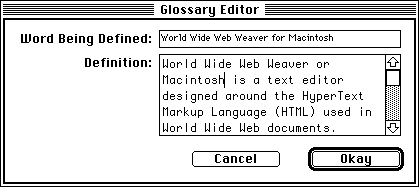
A glossary tag is much like a glossary or dictionary entry. A glossary contains a word being defined and the word's definition. Example:
- Word Entry
- Definition of the word
Where the "Word Entry" is the word being defined and "Definition of the word" is the definition. Obviously this tag can be used for far more than glossary and dictionary entries but the idea remains the same.
To create such glossary entries, use the Glossary Editor which you can open by selecting Glossary from the Tags menu or from the toolbar. The Glossary Editor contains the following items...
- Word Being Defined
- This is the word or phrase being defined; it is placed above and to the left of the definition.
- Definition
This is the definition of the word or phrase; it is placed below the word or phrase and indented.
-
 Graphic
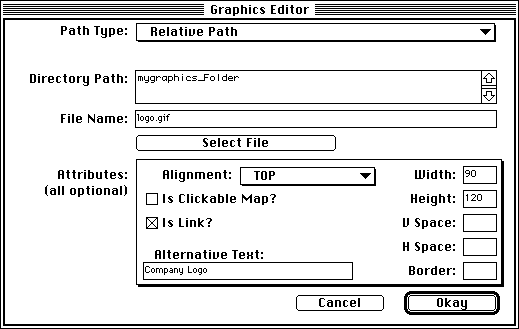
To insert graphics into your Web pages you use World Wide Web Weaver's Graphic Editor. Before you try to insert a graphic into your Web page, make sure it's in a format the Web understands. As of the time of the writing of this manual, only GIF and JPEG formats are supported by most web browsers, but World Wide Web Weaver does not force you to use these types. Your graphic file must also end with the correct suffix. GIF files must end with the suffix ".gif" (don't forget the period; Mac file names generally don't have them but the Web needs them) while JPEG files require the suffix ".jpg."
After you have the graphic file in the right format and have placed into the directory you want it in, just place the insertion point at the desired location in your HTML file and choose the Graphic option under the Tags menu (or on the toolbar).
The Graphic Editor consists of the following items:
- Path Type
- This pop-up menu specifies whether the graphic you are inserting uses a relative path, meaning the file is a local file, or uses an absolute path, (generally used when the graphic is on a different server).
- URL (not show above)
- This option is only available when you specify an absolute path. When it is available, this is where you enter the full URL of the graphic file you are inserting.
- Directory Path
- If you are using the relative path type, this field is where you place the directory path to the graphic file. Note: Do not include the name of the file in the directory path.
- File Name
- If you are using the relative path type, this field is where you place the name of the graphic file.
- Select File
- This button allows you to use the standard Macintosh open file dialog window to select the graphic file you are inserting. Using this option allows World Wide Web Weaver to automatically insert the directory path and file name for you, helping to eliminate the chances of error. Note: If your graphic is in GIF format, this option will also insert the height and width of the graphic in the Height and Width fields (see below).
- Alignment
- This pop-up menu allows you to set the alignment of the graphic with respect to the line of text in which the graphic is contained.
- Is Clickable Map?
- If this checkbox is checked, the graphic tag is marked with the ISMAP attribute, indicating that the graphic is a clickable map. World Wide Web Weaver will also prompt you for the URL of the map server associated with this map when you finish with the graphic editor if this checkbox is checked.
- Is Link?
- If this you check this checkbox, then when you finish with the graphic editor, World Wide Web Weaver will prompt you for the URL to which this graphic will link.
- Alternative Text
- This is the text that will be displayed in place of the graphic if the user has auto-load images disabled, the user's Web browser does not support graphics, or if any error occurs during the process of loading the graphic.
- Width
- This is the width you want used when displaying your graphic.
- Height
- This is the height you want used when displaying your graphic.
- V Space
- This is the amount of spacing you want on each side of the graphic. You can use this in conjunction with H Space to give your graphic a precise location with respect to the text and the page.
- H Space
- This is the amount of spacing you want on the top and bottom of the graphic. You can use this in conjunction with V Space to give your graphic a precise location with respect to the text and the page.
- Border
- This is the size (in pixels) of a border you want around your graphic. Note: If left blank, your graphic will have no border. Note: H Space and V Space are calculated from the edge of your graphic including this border.
-
 Head
Head
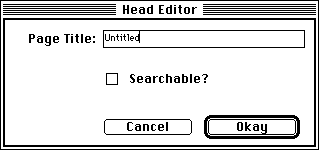
Proper HTML documents contain the following outline...
<HTML>
<HEAD>
<TITLE>
</TITLE>
</HEAD>
<BODY>
</BODY>
</HTML>
In the above outline the HEAD tag is used to mark document attributes such as a title. To edit the HEAD tag, select Head from the Tags menu or from the toolbar. The Head Editor contains the following items:
- Title
- This is the text that will be displayed in the title bar of the window containing the page.
- Searchable?
- This checkbox adds the <ISINDEX> tag to the Head area when checked. This tag is used in conjunction with a search engine, an advanced topic that is beyond the scope of this manual. Suffice to say that if you wish your page to be indexed by any of several automatic web crawlers that try to keep up to date with new information appearing on the Web, you will want to check this box.
-
 Horizontal Line
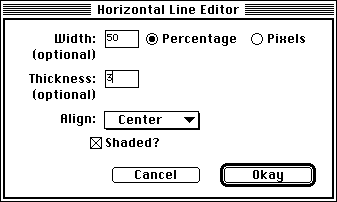
As the name implies, the Horizontal Line Editor allows you to insert horizontal lines in your pages easily. To do so, simply choose the Horizontal Line option from the Tags menu or from the toolbar.
The Horizontal Line Editor contains the following items:
- Width
- Use this item to define the width of the line, either as a percentage of the window width or in absolute size measured in pixels. If you use a percentage, the horizontal line will occupy that percentage of the width of the user's window. If you choose pixels, the width is the number of pixels the line will span horizontally. This means, among other things, that if you use a percentage value, the line will always occupy the same relative portion of the width of a window regardless of the user resizing it. If you use pixels, however, the line will always be exactly that number of pixels wide, which means it may occupy relatively little or all of the window's width as the user resizes the window. Note: If left blank, the horizontal line will span the the entire width of the user's window.
- Thickness
- This is the number of pixels the line will span vertically. If left blank, the default is 1 pixel thick.
- Align
- This pop-up menu sets the line's horizontal alignment. Note: you should experiment with the interactions of alignment and width. For example, a horizontal line set to a specific pixel width and then centered in a window that is too narrow to show the centering will not display properly.
- Shaded?
- This checkbox indicates whether the horizontal line is shaded or simply a solid thickness.
-
 Link
Link
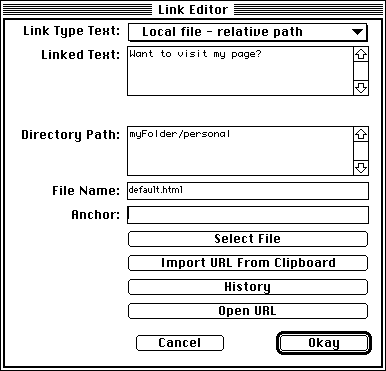
The most obviously useful feature of the World Wide Web is the ability it provides to connect pages to other pages and to supported services. These links allow the user to select (click on) specific text (usually colored and underlined or otherwise highlighted depending on the user's preferences) and the Web browser will connect to the appropriate page, FTP site, Gopher site, etc. To create such link tags in World Wide Web Weaver, you use the Link Editor by selecting Link from the Tags menu or from the Toolbar.
The Link Editor contains the following items:
- Link Type
- This is the type of link you wish to create (HTML file, Gopher, Telnet, etc.)
- Linked Text
- This is the text the user will select to use the link. Note: If you had any text selected when opening the Link editor, that text will be placed here automatically.
- Server Address (not show above)
- When you are defining a link type other than a local file, use this field to provide the address of the server to which the link points.
- Directory Path
- If the link points to a file in a folder (or folders), enter the directory/folder path here. Note: Do not include the file name itself, just the path up to the file name.
- File Name
- If the link points to a specific file, enter the file's name here.
- Anchor
- If you are linking to a HTML file that contains anchor points and want to link to a specific anchor point, enter the anchor point here.
- Select File
- You can use the "Select File" button to bring up a standard open file dialog window in which you can select the local file; World Wide Web Weaver will automatically insert the appropriate information in the Link editor. Note: If you are linking to a HTML file that contains anchor points, World Wide Web Weaver will ask you which (if any) anchor point to which you want the link to point.
- Import URL From Clipboard
- You can use this button to import a URL that you have pasted to the Clipboard; World Wide Web Weaver will then insert the appropriate information into the Link editor.
- History
- This button allow you to select a link to you used earlier insert into the Link editor.
- Open URL
- If you have installed and configured Internet Config, you can press this button to test the entered link. Internet Config will attempt to open the appropriate Internet client and go to the desired location.
-
 List
List
HTML defines the List tag to permit you to include a variety of types of lists in your HTML documents. There are three basic types of lists:
|
Numbered
|
Unnumbered
|
Description
|
- apples
- oranges
- pears
| |
- apples
- oranges
- pears
|
In the numbered list, of course, each item is numbered. In the unnumbered list each item is NOT numbered; instead, a bullet (or other marker depending on the Browser and on user preferences) appears before each item. In the description list, any item in the list can be indented.
You can create a list by opening the List Editor from the Tags menu (or toolbar) or you can import items into your list by selecting lines of text in your document and then opening the List Editor. In that case, each line, including blank lines actually entered between items, will appear as an item in the list. This is seldom what you want, so you should probably eliminate arbitrary white space between lines before carrying out this operation.
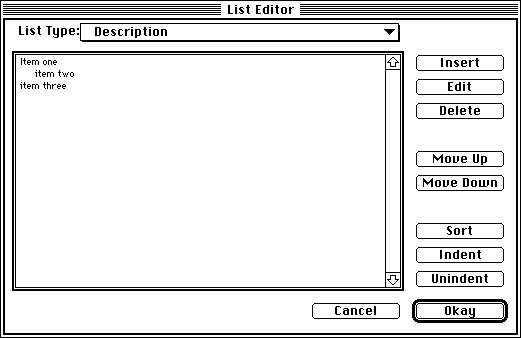
The List Editor contains the following items:
- List Type
- This is the pop-up menu from which you choose the type of list.
- Insert
- Use this button to create new items and insert them into the list. (Note that you cannot enter items directly into the large list area in the editor window itself.)
- Edit
- When you have an item in the list display selected, you can use this button to edit its contents. (Note that double-clicking on the entry in the list display also opens its contents for editing.)
- Delete
- You can use this button to delete selected items from the list. (Note that you are not warned about the deletion, but if you accidentally delete one or more items, you can click the "Cancel" button to avoid saving the list without those items.)
- Move Up
- Use this button to move a selected item (or items) up a position in the list.
- Move Down
- Use this button to move a selected item (or items) down a position in the list.
- Sort
- Use this button to sort the items in your list alphabetically. You will be warned that this operation cannot be undone and given a chance to change your mind.
- Indent
- When the list type is set to description, you can use this button to indent selected item (or items) in the list.
- Unindent
- When the list type is set to description, you can use this button to remove indention from the selected item (or items) in the list.
- List Display
- This is a display of the the list as it is currently defined. You can select items in the list and use many of the buttons in the List editor as described above.
-
 MailTo
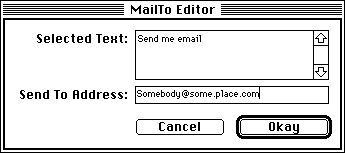
The MailTo Editor allows you to create a link in your document that allows users to send email to a specific email address right from the their Web browser. To do so, simply move the insertion point to the desired location in the file and select the MailTo option from under the Tags menu or from the toolbar.
The MailTo Editor has the following items:
- Selected Text
- This is the text the user will click on to use the MailTo link. Note: If you have any text selected when you open the mailto editor, the text will be placed in this field for you.
- Send To Address
- This is the email address to which the email message will be sent.
-
 Simple Table
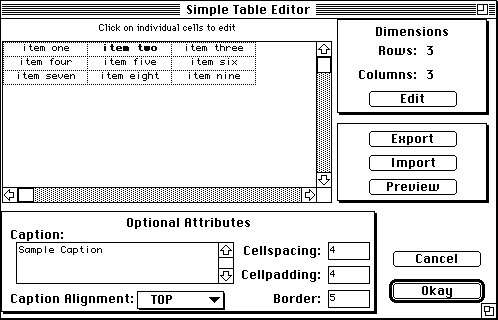
Some (but not all) Web browsers support table layouts in which you can arrange data in rows and columns. Creating and using tables in HTML documents can be quite complex and confusing. To help ease the complexity of tables, World Wide Web Weaver provides the Simple Table Editor. The Simple Table Editor allows you to make all but the most complex tables using a straightforward interface.
To create a simple table, place the insertion point at the desired location and select Simple Table from the Tags menu or from the toolbar.
The Simple Table Editor contains the following items:
- Table Display
- This is a display of the table. To edit a cell in the table, simply click on the cell you want to edit. This will display the Table Cell Editor.
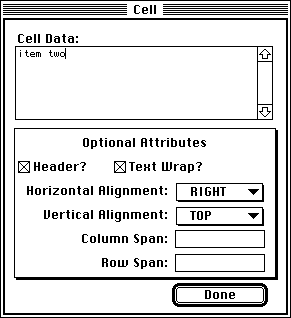
The Table Cell Editor contains the following items...
- Cell Data
- This is the data to be displayed in the cell.
- Header?
- When checked, this indicates that the cell is a header and should be displayed in bold.
- Text Wrap?
- When checked, this indicates that the cell's data may be wrapped to fit in the space in the window. This option should normally be checked.
- Horizontal Alignment
- This allows you to set the horizontal alignment of the data relative to the cell.
- Vertical Alignment
- This allows you to set the horizontal alignment of the data relative to the cell.
- Column Span
- This option sets the number of columns the cell will span. This option defaults to spanning just one column.
- Row Span
- This option sets the number of rows the cell will span. This option defaults to spanning just one row.
- Dimensions
- Use the Edit button to change the dimensions of your table.
- Export
- Use this option to export your table to a text file. Each cell in a row is separated by a tab character and each row is separated by a return character in the export file. Note: This is a good way to save a copy of your table's data so you can return to the Simple Table Editor and re-edit your table. See Import for more details.
- Import
- Use this option to import a table you have exported from World Wide Web Weaver or another program (such as a word processor or database). The import file must be a text file in which each row ends with a return character and each cell in the row except the last ends with a tab character.
- Preview
- Use this button to preview your table in your web browser before finishing in the simple table editor. This is particularly useful because once you click on the "Okay" button you will have to start over editing the table. There is no way for World Wide Web Weaver to extract your table information from your document and re-display it here for editing. Generally, until you are certain you are satisfied with the appearance of your table, you should export its contents and preview its appearance before accepting it with the "Okay" button.
- Caption
- You can give your table an optional caption by typing it into this field. The caption appears outside the table itself. Once you have completed work on the table, you will probably want to apply some Format Tags to the caption in the HTML document itself.
- Caption Position
- Use this pop-up menu to set the position of the optional caption to be above or below the table.
- Cellspacing
- This is the amount of horizontal space, in pixels, you want between adjacent cells in your table.
- Cellpadding
- This is the amount of vertical space, in pixels, you want between adjacent cells in your table.
- Border
- This is the size of the border (if any) you want around each cell and entire table. This value is measured in pixels.
Preferences
Using the Preferences option under the Edit menu you can edit the following settings...
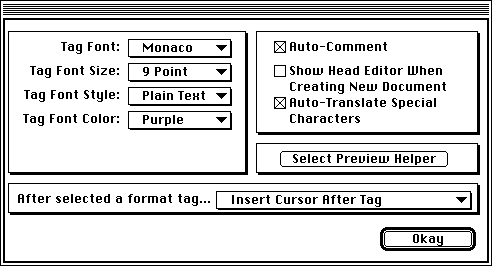
- Tag Font, Size, Style and Color
- Use these pop-up menus to set the default font, size, style and color World Wide Web Weaver will use when it displays tags in its editing window. (Note: These values do not affect the display of the text in a Web browser, only their appearance in the World Wide Web Weaver editor.)
- Auto-Comment
- When checked, World Wide Web Weaver will automatically insert generic comments before some complex tags when using tag editors.
- Show Head Editor When Creating New Document
- When this checkbox is checked, World Wide Web Weaver will automatically open the Head editor when you create a new document using the New command under the File menu. This allows you to begin your document-creation session by supplying the document's heading.
- Auto-Translate Special Characters
- When this checkbox is checked, World Wide Web Weaver will automatically translate special characters that you type from the keyboard into their equivalent HTML tags. For example, if you press Option-s to type the ß character, World Wide Web Weaver will automatically insert the tag ß. The only exceptions to this are the ", &, < and > characters, since these characters are commonly used to construct HTML tags.
- Select Preview Helper
- The Select Preview Helper button opens a standard open file dialog from which you can select or change the Web browser application to be used to preview your document.
- After Selecting a Format Tag...
- When you select text and then a format tag from either the Tag menu or a Tag Floater window, World Wide Web Weaver surrounds the selected text with the desired tag. Having done this, World Wide Web Weaver places the insertion point after the previously selected text with the new tag. Using this pop-up menu, you can choose where you want the insertion point to be after adding format tags. You can choose to place the insertion point after the text and tag, after the text, but inside the tag, or you can even choose to keep the text selected or both the text AND the tag selected.
Tools Aliases
In the same folder as World Wide Web Weaver is a folder called 'HTML Extensions'  In this folder is another folder called 'Tools Aliases'. Any file (or alias to a file) placed in this folder will show up under the Tools menu within World Wide Web Weaver, giving you can quick and easy access to the tool without leaving World Wide Web Weaver.
 Example: 
Tag Floater Windows
Tag Floater windows are palette windows that contain lists of format tags. You can use these lists to quickly insert format tags into your documents. World Wide Web Weaver comes with a few windows already created. To edit these Tag Floater windows, simply press the Edit button on the window you wish to edit. This will bring up the Tag Floater Editor.
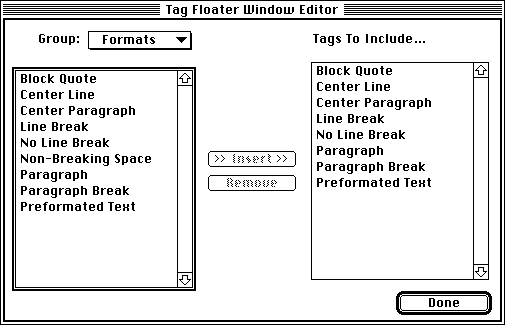
The Tag Floater Editor contains:
- Group pop-up menu
- Use this menu to display different groups of format tags which you can then insert into the Tag Floater Window list.
- Insert
- Use this button to insert the selected item from the list on the left hand side of the window into the list of tags listed in the Tag Floater Window.
- Remove
- Use this button to remove items from the list of items in the Tag Floater Window.
To create new Tag Floater Windows use the Create Tag Floater Window option from the Windows menu.
Edit Simple Tags
HTML is an evolving standard and World Wide Web Weaver does not attempt to implement all of the subtle and less-used features of the HTML specification as it stands today. But you can extend the capabilities of World Wide Web Weaver by adding new format tags for styles and characters using the Edit Simple Tags option from under the Tools menu to open Simple Tag Editor application. This separate program is included with World Wide Web Weaver at no extra charge.
From the Simple Tag Editor you can:
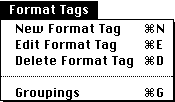
- Create, Edit and Delete Format Tags
- When creating or editing format tags, use the Format Tag window shown below.
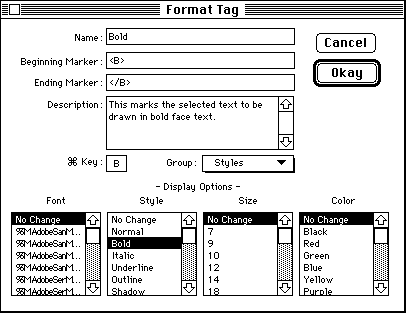
- You place the following information in each field to define or edit a tag:
- Name
- This is the name of the tag. Each tag must have a unique name.
- Beginning Marker
- This is the part of the tag that goes before the text. In the case of the the bold tag the beginning marker would be the text <B>
- Ending Marker
- This is the part of the tag that goes after the text. In the case of the bold tag the ending marker would be the text </B> Note: This field is optional.
- Description
- This is a description of the tag and its purpose. This description is used as balloon help and to describe the tag when using the Tag Descriptions option under the Help menu in World Wide Web Weaver. Note: This field is optional.
- Command Key
- This is the character of the command key short cut for this tag. Note: This field is optional.
- Group
- This is the group to which this format tag belongs. Placing a format tag in a group is for organizational purposes only.
- Font
- This is the font the text surrounded by the format tag will be drawn in within World Wide Web Weaver.
- Style
- This is the font style the text surrounded by the format tag will be drawn in within World Wide Web Weaver.
- Size
- This is the font size the text surrounded by the format tag will be drawn in within World Wide Web Weaver.
- Color
- This is the font color the text surrounded by the format tag will be drawn in within World Wide Web Weaver.
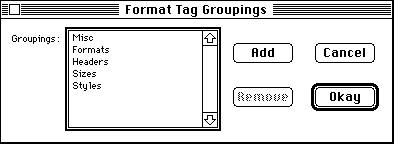
- Create and Delete Groups
- Format tags are grouped together for organizational purposes. Use the Groupings option to access the window below. This window allows you to add or delete group names.
- Create, Edit and Delete Special Characters
To create or edit special character tags, use the Special Character window show below.
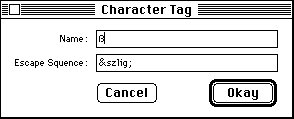
- Name
- This is the name of the special character tag. The name should be the character the tag is supposed to represent. For example, the tag &szling; represents the character ß. The name of this special character should be ß.
- Escape Sequence
- This is the HTML tag used to represent the special character.
Some of the more advanced features of World Wide Web Weaver are described below.
- Export
- When using the Export command from under the File menu you are given the option of exporting a copy of your document (without font, style, size or color information) to a text file using Macintosh, DOS/Windows, or Unix format.
- Scan Document For Tags
- If you want World Wide Web Weaver to scan your document for tags and label then in the appropriate color, size, style and font, you can use the Scan Document For Tags option from under the Tools menu. This is particularly useful when importing text/HTML or to have tags marked after you have manually added tags during an editing session.
- Scan Document For Special Characters
- If you want World Wide Web Weaver to scan your document for special characters and replace them with the appropriate HTML tags you can use the Scan Document For Special Characters option from under the Tools menu. This is particularly useful when importing text/HTML. Note: This command does not replace the ", &, <, (non-breaking space), or > characters since these characters are commonly used to construct HTML tags.
- Insert Date
-
To insert the current date (in the format 10/15/1995) use the Insert Date command from under the Tools menu.
- Insert Time
- To insert the current time (in the format 11:32 PM) use the Insert Time command from under the Tools menu.
- Open URL...
-
To go to a specific URL using the appropriate Internet client application, simply select the Open URL... command from the Tools menu. Using Internet Config, the appropriate client will be opened and will automatically connect to the desired location.
Example: If you want to go the URL:
http://www.northnet.org/best/
Select the Open URL... command, enter the above URL and press the Okay button and your web browser will open to the Web page at that location.
Note: You must have the freeware program Internet Config, which is shipped with World Wide Web Weaver, installed and configured before this option will work.
Additional Help Learning HTML
For additional help learning HTML we suggest the following web sites...
World Wide Web Weaver Frequently Asked Questions
Below is a list of frequently asked questions about World Wide Web Weaver.
Q. Why does World Wide Web Weaver keep crashing on my computer?
A. World Wide Web Weaver obviously isn't meant to crash but like any other software program, it does occasionally run into problems because of various reasons. Here is a list of possible techniques to try if you experience crashes.
- If using on a PowerMac, try turning off 'modern memory mapping' in the 'memory' control panel.
- Though this should not be necessary since there is no know incompatibility between World Wide Web Weaver and the modern memory mapping, it is however a tip you may want to use for any program that crashes on a Power Macintosh.
- Disable system extensions by holding down the 'shift' key when booting up your computer. If World Wide Web Weaver no longer crashes when disabling system extensions then you obviously have a conflict with a system extension and World Wide Web Weaver. If this is the case, you will have to remove individual system extension and control panel until you find the source of the problem.
- Delete the 'Web Weaver Settings F.' folder in the Preferences folder located in your system folder.
- Run Norton Utilities, Disk First Aid, or another diagnostics program on the startup disk (and hard drive containing World Wide Web Weaver if different that the startup disk) to see if you have a problem with your hard drive (either in hardware or software).
- Rebuild the desktop on all volumes by holding down the 'option' and 'command' keys when booting up your computer.
- Try increasing the memory to World Wide Web Weaver by using the Finder's 'Get Info' command under the 'File' menu.
- Try reinstalling World Wide Web Weaver.
If the above techniques still do not help, please contact Miracle Software Inc.via email at Best@Northnet.org with a description of the error. Note: If an error number is given, please include this, it can sometimes prove to be quite helpful.
Q. I am unable to open files containing over 32k of text, it keeps saying the file is too big, what is wrong?
A. Nothing is wrong, in order to stay compatible with different languages and other programs, World Wide Web Weaver was written using Apple's 'TextEdit' manager routines which have a 32k limit on text. Since World Wide Web Weaver stores the style, font, color, and size information of your text in the same file, your files may actually be over 32k but they still can not contain over 32k of text (32,767 characters to be specific).
Q. How do I find out more about specific tags?
A. Two ways;
- Checkout the list of installed tags using the Tags Description command from under the Help menu.
- Checkout some of the URLs listed at the beginning of this section in the manual.
Q. After inserting a tag for a gif file and using the 'Preview' command all I get is a ? mark, what is wrong?
A. Checkout the crash course to World Wide Web Weaver in the How To Use World Wide Web Weaver section of this manual, it will give a step by step description of how to add graphics to your pages.
World Wide Web Weaver and World Wide Web Weaver for Macintosh are Copyright 1996 Miracle Software Inc. All Rights Reserved. All other product names are trademarks or registered trademarks of their respective holder.
If you would like to know more about Miracle Software Inc. or any of its products, you can reach us at...
118 Leroy St. D4
Potsdam NY 13676
Phone: (315) 265-0930
Fax: (315) 265-1162
Email: Best@northnet.org
|  |